Andy Boxall / Tech Reader
Microsoft Word is one of the most feature-rich word processing tools gifted to us human beings. In fact, the very word “Word” has invaded nomenclature to the point where any discussion of this type of software, regardless of what the product is actually called, typically results in at least one person calling the software “Word.”
With each new release of the industry-lauded software, we get more and more capabilities. But this shouldn’t prevent us from knowing how to incorporate classic Word elements, such as the hanging indent. We understand how tough it can be to stay on top of how to use Microsoft Word though, so we’ve made this guide to teach you how to quickly and easily add a hanging indent to your next Word doc.
How to do a hanging indent in Microsoft Word on Windows
The following instructions can be applied to these versions of Microsoft Word for Windows: Word for Microsoft 365, Word 2021, Word 2019, Word 2016, and Word 2013.
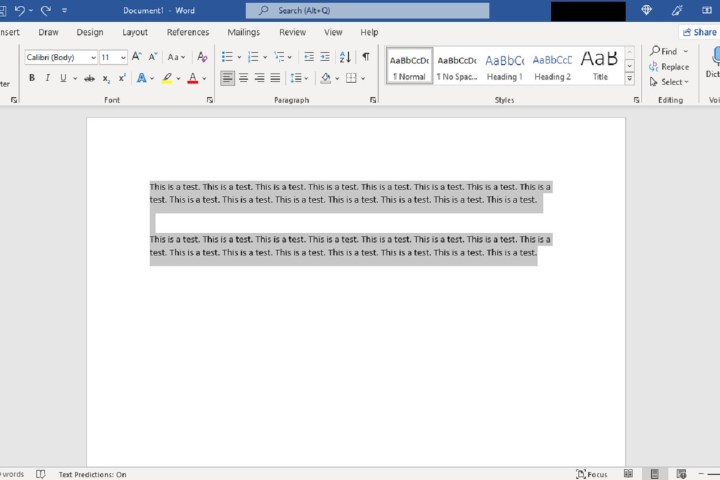
Step 1: Open the Word document you want to edit. Then select the paragraphs you want to indent.
screenshot / Tech Reader
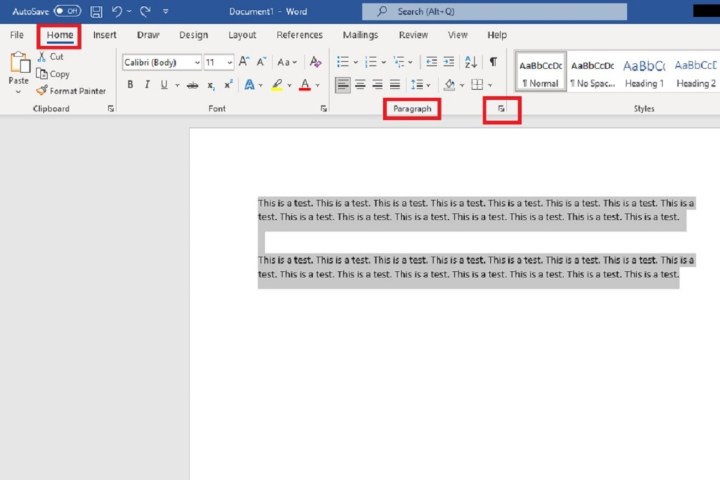
Step 2: Select the Home tab, and within the Paragraph subsection, click on the dialog box launcher button, located in the bottom right corner.
screenshot / Tech Reader
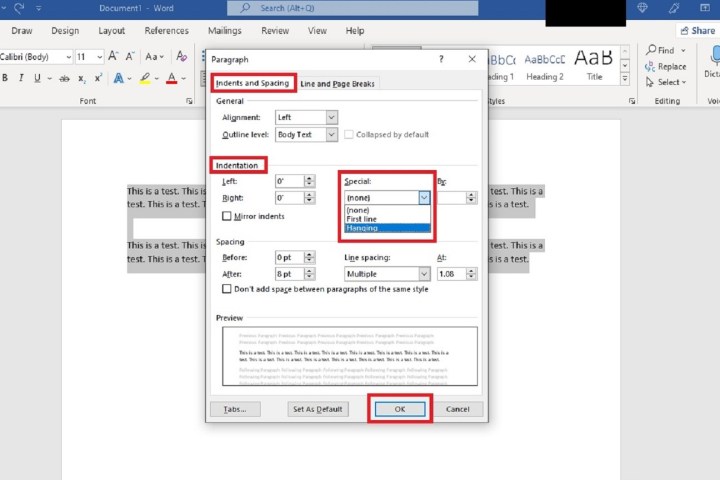
Step 3: Once the Paragraph dialog box appears, the Indents and Spacing tab should already be selected. Under that tab, and within the section labeled Indentation, there is a drop-down menu under the word Special. Click on that drop-down menu and select Hanging from the options listed in the menu.
Click OK. Your selected paragraphs should now show hanging indents. and style
screenshot / Tech Reader
How to do a hanging indent in Microsoft Word on macOS
Microsoft Word works a little differently if you have the macOS version, but it’s still possible to create hanging indents with the right steps. Here’s what to do:
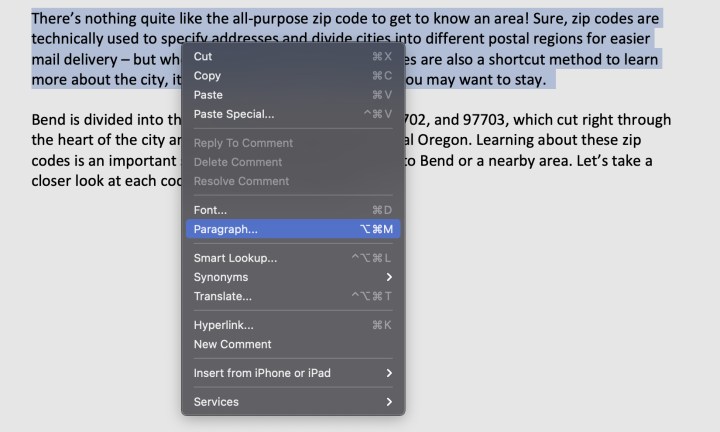
Step 1: Start by highlighting the specific paragraph or list that you want to start with a hanging indent.
Step 2: Now right-click on the highlighted text. In the menu that appears, choose the Paragraph… option.
screenshot / Tech Reader
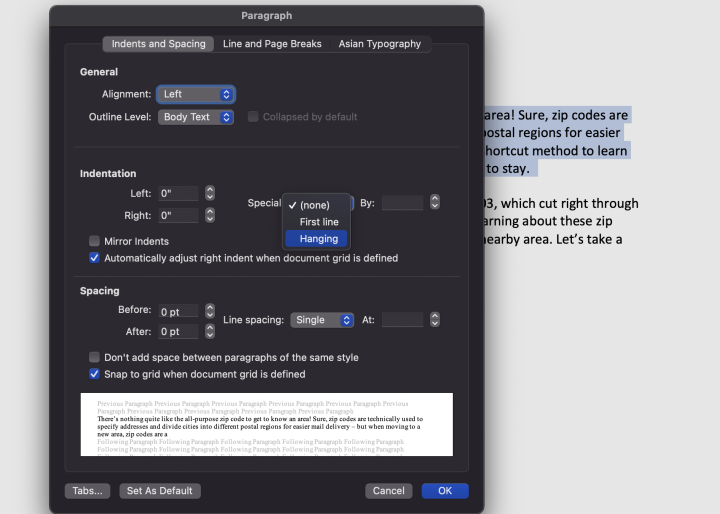
Step 3: This will open the paragraph menu, which is quite similar to the menu used in the PC version. Look at the central Indentation section.
Step 4: Navigate to the Special dropdown menu, which by default is set to None. Select it, and choose Hanging.
screenshot / Tech Reader
Step 5: Hanging indents will now be automatically enabled. The section to the left of Special shows how deep the hanging indent will be, starting with 0.5 inches. You can adjust this manually to a length that you prefer. When finished, select OK to make the changes.
Step 6: You can also choose Set as Default, which enables hanging indents for all your work. If you are working in a document where everything needs a hanging indent, you can choose this option. Otherwise, it’s not necessary.

screenshot / Tech Reader
How to enable hanging indents in Chrome OS
We haven’t forgotten about you Chromebook users! Chrome OS is designed to run fast and light, with a focus on web apps and cloud storage. That’s why we recommend using the lightweight Microsoft Word web app, which you can access here by signing on with your Microsoft account. That will help save on space, but you’ll need to know how the web app handles hanging indents.
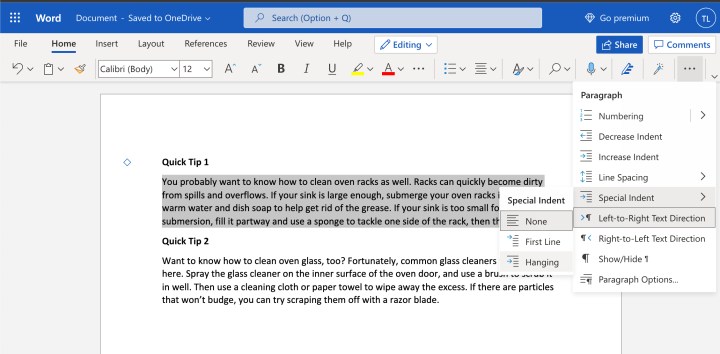
Step 1: With a Word document open via Microsoft’s online services, highlight the text that you want to change to a hanging indent.
screenshot / Tech Reader
Step 2: Look at the right side of the upper menu options and find the three-dot icon for more settings. Select it.
Step 3: In the dropdown menu that appears, select Special Indent. Then select Hanging. The indent should now be applied.
Step 4: Note that documents created in this web app are saved to OneDrive and can be easily accessed from other computers.
Microsoft Word is an incredibly powerful document creation and desktop publishing tool, and has a whole range of features and functions to improve not just the layout and formatting of your report or essay, but the creation of new types of document. So, you can add double spacing, or you can add page numbers to new and existing documents (and style them!).
You can even use Microsoft Word to print labels — the possibilities are endless.
