Resizing an image is something we’re all going to have to do at some point in our digital lives. And whether you’re using Windows, macOS, or you’re rocking a Chromebook, there are ways to scale images up and down on each PC. Fortunately, these are all relatively simple methods too.
While there’s a near-limitless world of photo-editing programs out there, we made sure to highlight tools in this multi-step guide that any Windows, macOS, or Chromebook user will have access to.
With that being said, here’s how to resize images in Windows 11, macOS Sonoma, and ChromeOS.
Image used with permission by copyright holder
Windows 11
For Windows 11 PCs, we prefer to use the operating system’s native Photos app. Follow the steps below to resize an image in Photos on Windows 11:
Step 1: Right-click on the image and select Open with followed by Photos.
Step 2: Select the Three dots icon located in the app’s top-right corner.

Image used with permission by copyright holder
Step 3: Select Resize on the drop-down menu.
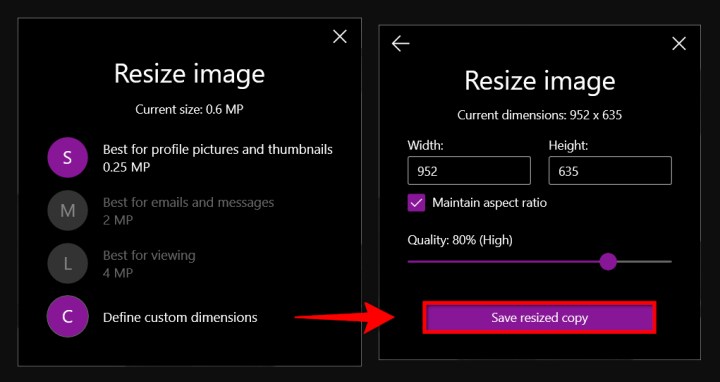
Step 4: A pop-up window appears. Select one of the three preset sizes (shown on the left). Otherwise, choose Define custom dimensions for a specific size. Another pop-up window appears (shown on the right).
Step 5: To keep the aspect ratio, select the box next to Maintain aspect ratio.
As you enter a number into one of the boxes, the other box will automatically adjust its number in proportion to the number you just entered. If the aspect ratio doesn’t matter, don’t check the box, and enter the numbers in both boxes.
Step 6: Select the purple Save resized copy button.

Image used with permission by copyright holder
macOS
On macOS, you can use Preview to resize images. Here’s how to do that:
Step 1: Right-click on the image and select Open. If Preview is not your default image viewer, select Open with followed by Preview instead.
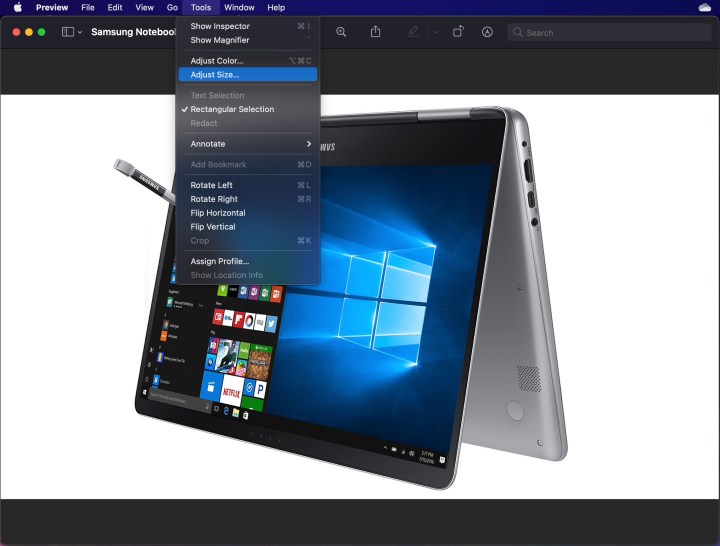
Step 2: Select Tools on the menu bar.
Step 3: Select Adjust size on the drop-down menu.

Image used with permission by copyright holder
Step 4: Enter the width and height information. You may need to switch the size type, like changing from inches to pixels, as shown above. Alternatively, you can select a preset size by selecting the arrows next to Fit into.
Step 5: Select the blue OK button to confirm the new size.
Step 6: To save the resized image, select File on the menu bar.
Step 7: Select Save.

Image used with permission by copyright holder
ChromeOS
You can use ChromeOS’ Gallery image viewer app to resize images. Use the steps below to resize images via Gallery:
Step 1: Right-click on the image and select Open with Gallery on the pop-up menu. Alternatively, if Gallery is not your default image viewer, select Open with followed by Gallery.
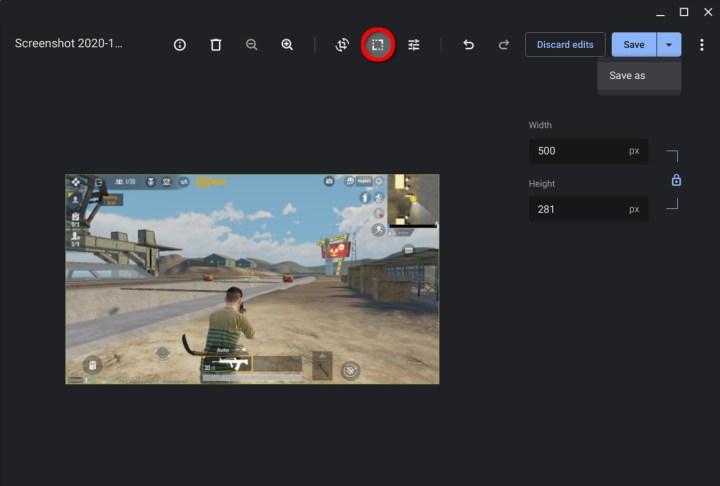
Step 2: Select the Rescale button at the top.
Step 3: Enter the width and height. Select the Chain icon to unlock the aspect ratio if needed.
Step 4: Select the blue Save button. Alternatively, select the blue Down arrow to choose Save as if you don’t want to alter the original image.
Web (Pixlr X)
Pixlr X is a free web app you can use to make simple edits to your images, including resizing them. Follow the steps below to resize an image using Pixlr X:
Step 1: Head to Pixlr X.
Step 2: Select the blue Open image button. Choose the image you want to edit.
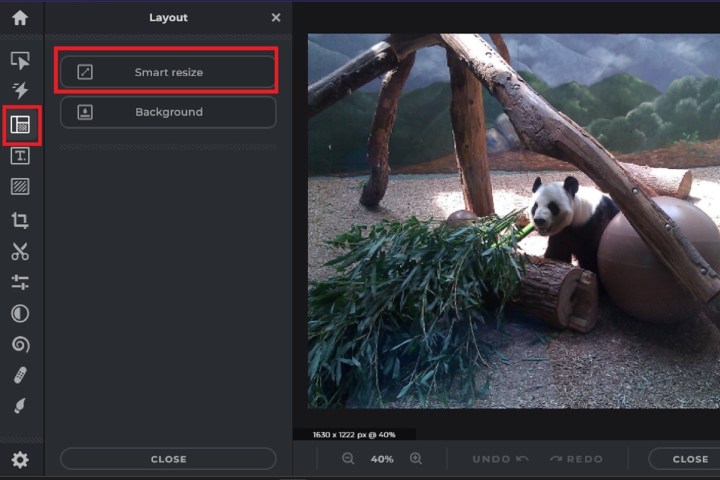
Step 3: Find the Layout and Template button and select it. It looks like a group of three rectangles.

screenshot/Anita George / Tech Reader
Step 4: In the Layout menu, select Smart resize.
Step 5: On the Smart resize screen that appears, you can enter in your desired width and height measurements, lock or unlock the aspect ratio with the Lock proportions toggle, or even choose from a variety of size presets.

screenshot/Anita George / Tech Reader
Step 6: Once you’ve made all your changes, select the blue Apply button.
Step 7: Find the blue Save button at the bottom and click it.
Step 8: Enter the file name, select your preferred file type, and adjust quality as needed. Once everything is as you want it, select the blue Save button.
Your edited image should be saved to your Downloads folder. There is a daily limit of three free saves.
Editors’ Recommendations

